Day to Night Makeup Using NYX Cosmetics | #BootsNYXRoutines *

AD – the following is a paid partnership with Boots, featuring NYX Cosmetics products.

I’m the kind of person that either goes all in, or for a very minimal casual look when it comes to my makeup. Doing my face to get ready to leave the house can take me anywhere between 10 minutes and 2.5 hours, depending on the occasion (much to the dismay of my friends when waiting for me to leave the house – oops)!

I’m a huge lover of NYX Cosmetics products, my makeup bag is full of them! So when Boots got in touch to challenge me to transport a subtle daytime look into a dramatic eye-catching glam face, using some of NYX’s excellent affordable, an d cruelty-free products – I was over the moon. Without hesitation my creative juices got flowing thinking about what I would do…

I’m going to guide you through a step-by-step of what I did to create each look, and hopefully it might inspire you to transport a day time ‘au naturelle’ face into something dramatic, colourful and eye catching using some of the amazing NYX products available at Boots.

A little note: I don’t consider myself a makeup artist in any way, so don’t take my words as gospel, these are just techniques and processes that I have found worked for me, and hope they may work for you too!

DAY TIME LOOK USING NYX COSMETICS

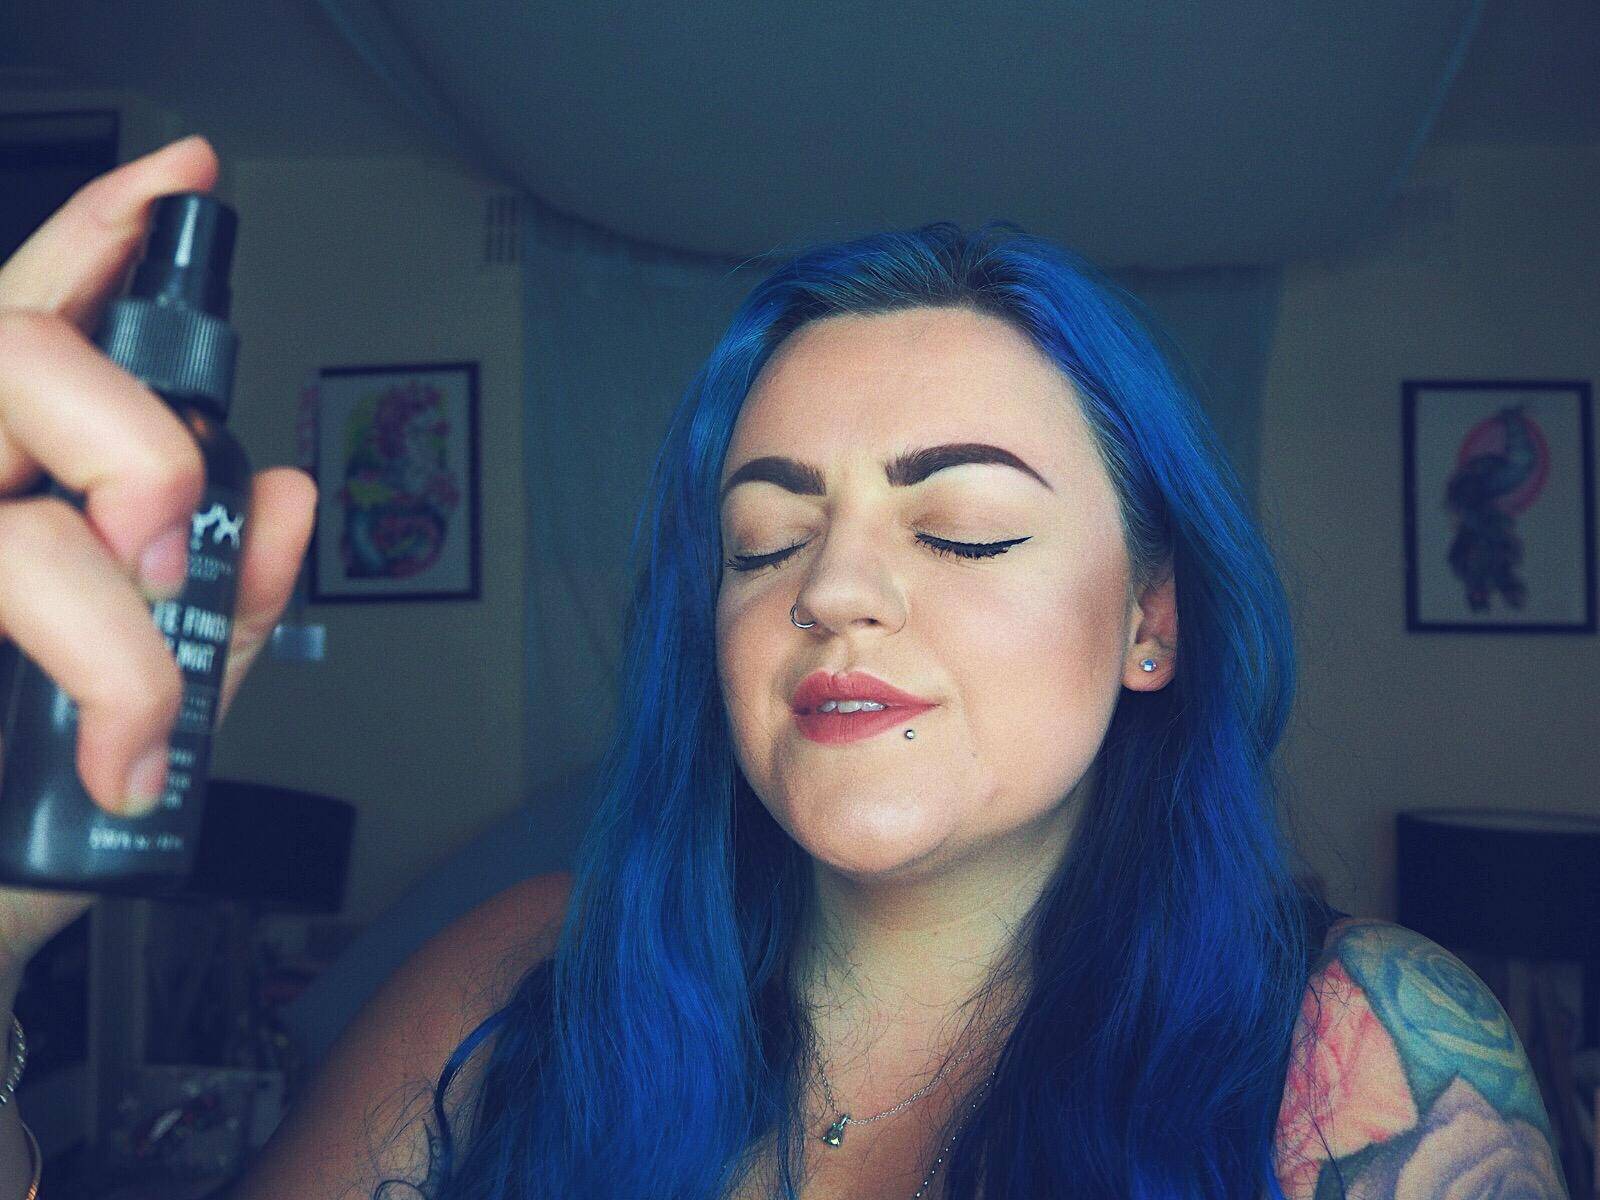
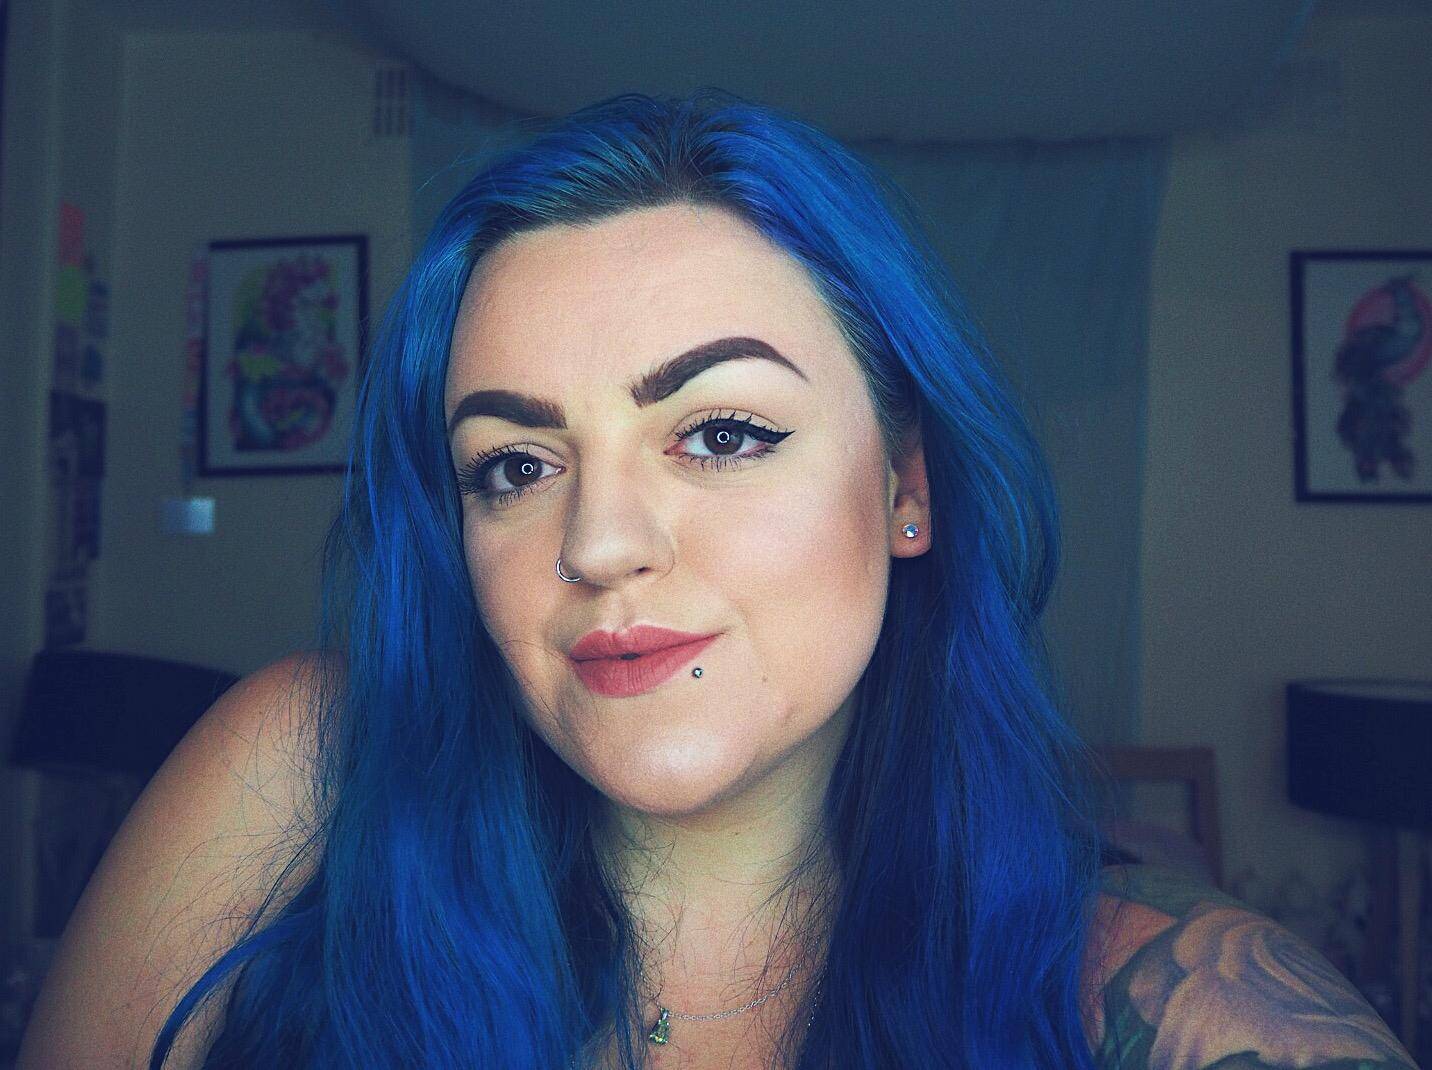
I work in an office during the week, so when I do my makeup for the daytime, it’s usually very subtle, and quite natural in style. Often it’ll be done just before leaving the house (and sometimes on the tube if I’m really running late…). So, I need products that are easy to use, long lasting and have a proper purpose.

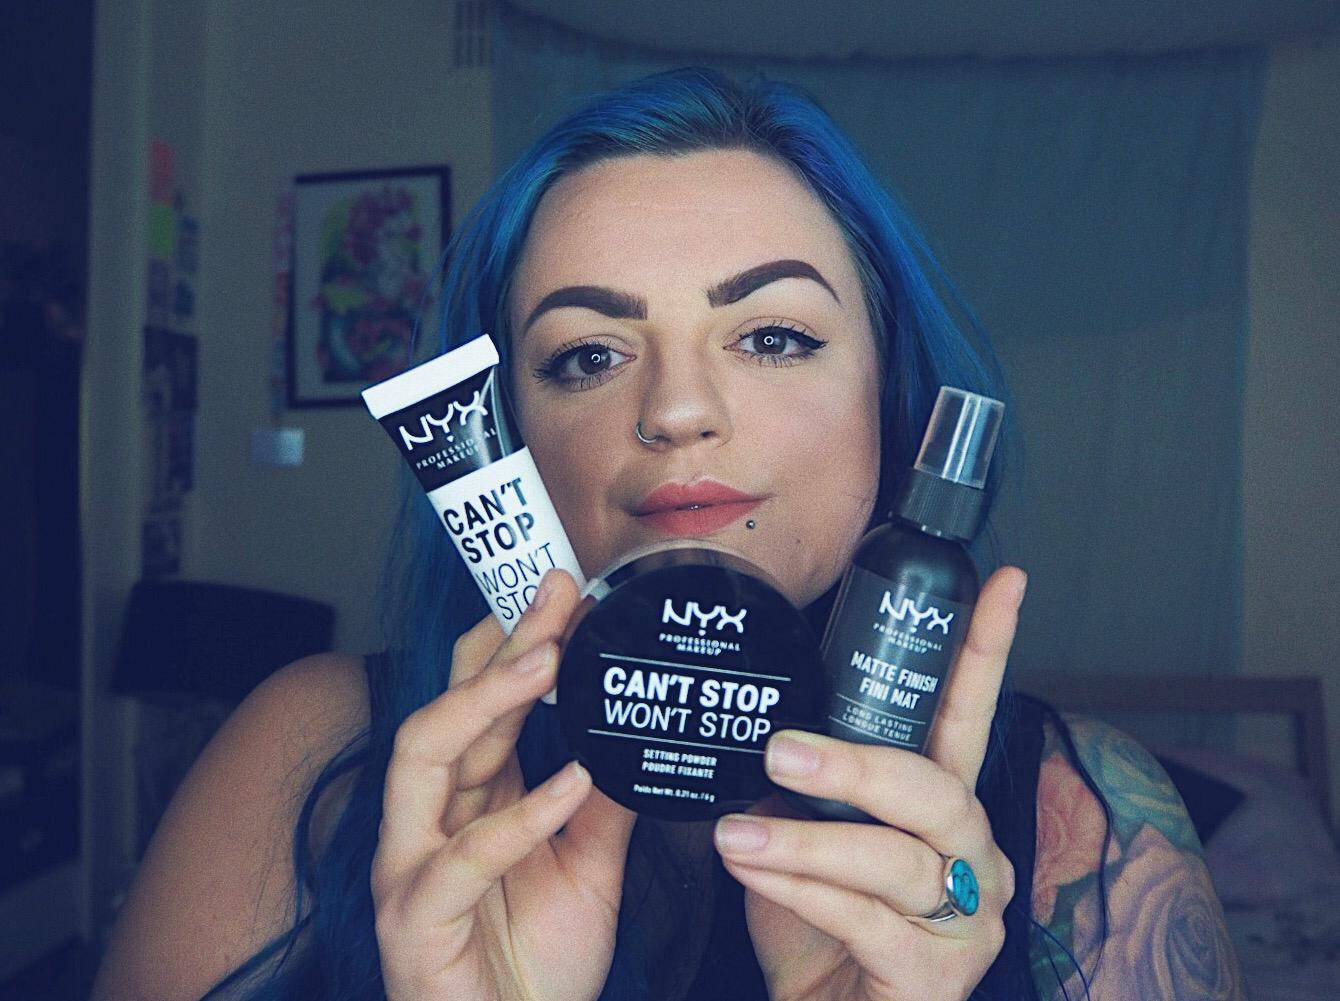
I went for an everyday “natural” look for my day time face. I used a selection of products: some gifted for this collaboration, and some others I’ve bought previously (each will be clearly labelled).

DAY LOOK: Product List

Products Used (* denotes gifted for this collaboration, all others bought myself):

  • Can’t Stop Won’t Stop Matte Primer *
  • Can’t Stop Won’t Stop Setting Powder – Light *
  • Highlight & Contour Pro Palette  
  • Micro Brow Pencil – Brunette *  
  • Worth The Hype Mascara – Black *
  • Epic Ink Eyeliner
  • Lingerie Lip – Bedtime Flirt  
  • Matte Finish Setting Spray

DAY LOOK: Step-by-step

  1. First I prepped my skin by cleaning it thoroughly and using some face moisturiser.
  2. Then I applied the ‘Can’t Stop Won’t Stop Primer’ all over my face. It has quite a thick texture, so you have to work fast and rub it in all over your face, then you gently *tap* to seal it.
  3. Next I used a blending sponge to apply my foundation and concealer, setting it (especially in areas that crease a lot – under eyes and forehead) with the ‘Can’t Stop Won’t Stop Setting Power’ powder in shade ‘Light’.
  4. Using the Highlight and Contour palette I added darker areas just below my cheekbones and to the sides of my nose, before blending out using the lighter colours in the palette.
  5. To highlight my cheekbones, nose tip, and cupids bow I used the colour ‘Ice Queen’ from the palette mentioned above.
  6. I adore a strong brow no matter day or night, so I created strong brow shapes using the ‘Micro Brow Pencil’ in shade ‘Brunette’. It has a brush on one end, so although I did hair strokes on the inner ends of my brows nearest my eyes, I blended them out a little with that to create a powder effect with slight texture.
  7. I used an eyelash curler and immediately used ‘Worth The Hype’ mascara. I built this up with a few applications, meaning the final lash look was thick and full.

  1. Liquid liner – ah how I love my wings! I am obsessed with the Epic Ink Liner from NYX and think it’s a fantastic dupe for some expensive brands (which are not worth the £ at all) this one I bought myself and will rebuy when it runs out, and it’s only £9 on the Boots website.
  2. Next it was time for my lips! If I’m doing lipstick in the day I always start with my favourite lip balm to neutralise the colour a little (and stop my lips from getting dry). The Lip Lingerie colour I chose was ‘Bedtime Flirt’. It’s a colour I like to refer to as “my lips, but better”. Peachy pink tones! Perfectly completing the look.
  3. To keep it all in place for the day I will always use a setting spray. The Matte Finish Setting Spray from NYX Cosmetics is one of my favourites.

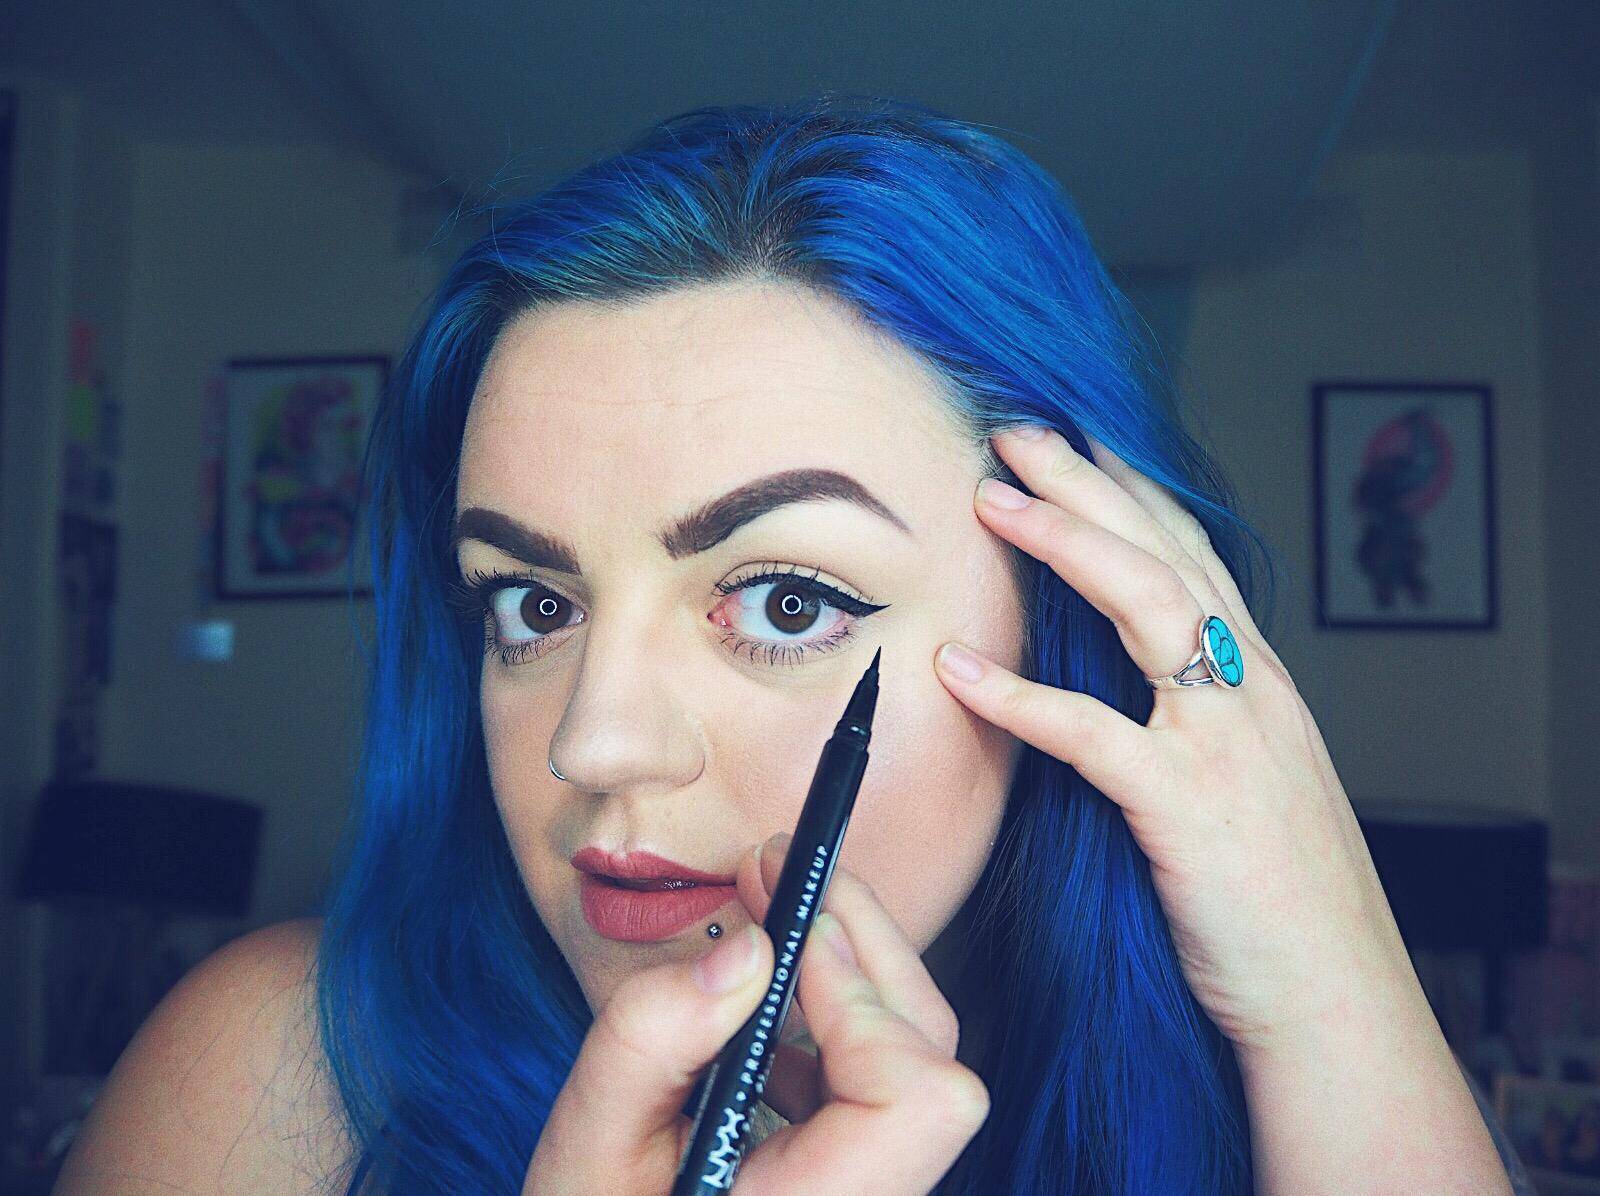
To add a little more to something simple like this, you could use a black, white or coloured gel liner/pencil in your waterline.

NIGHT TIME LOOK USING NYX COSMETICS

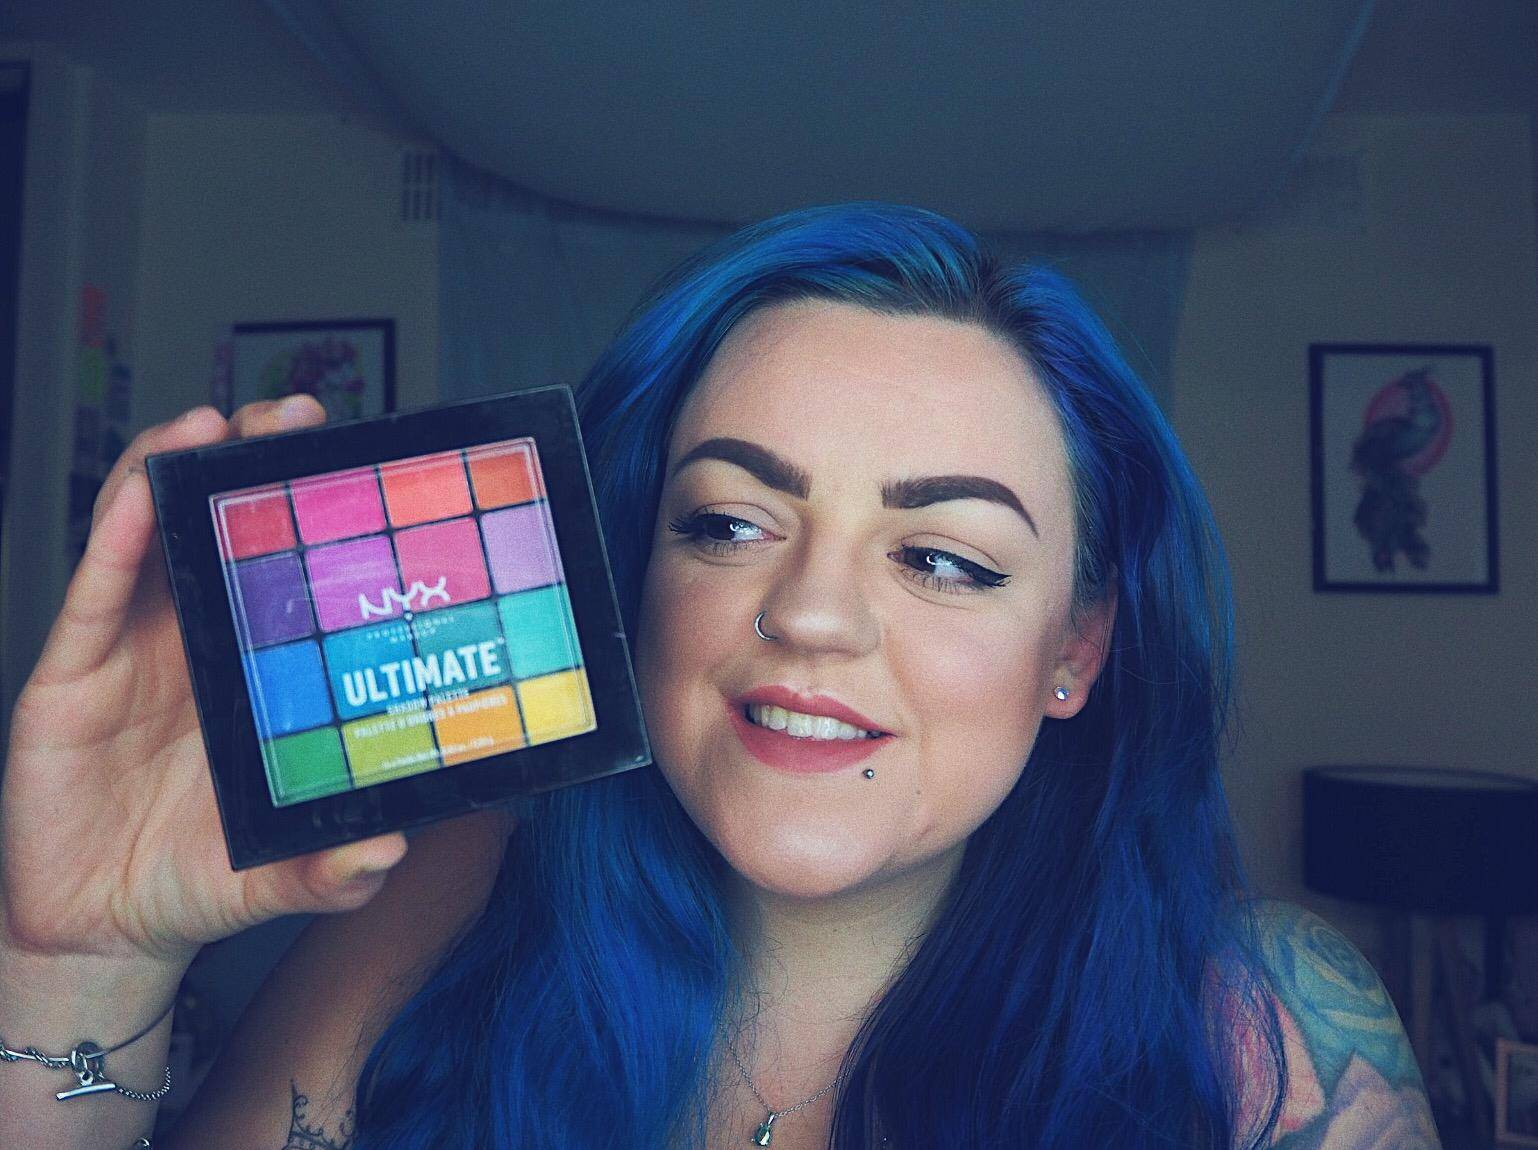
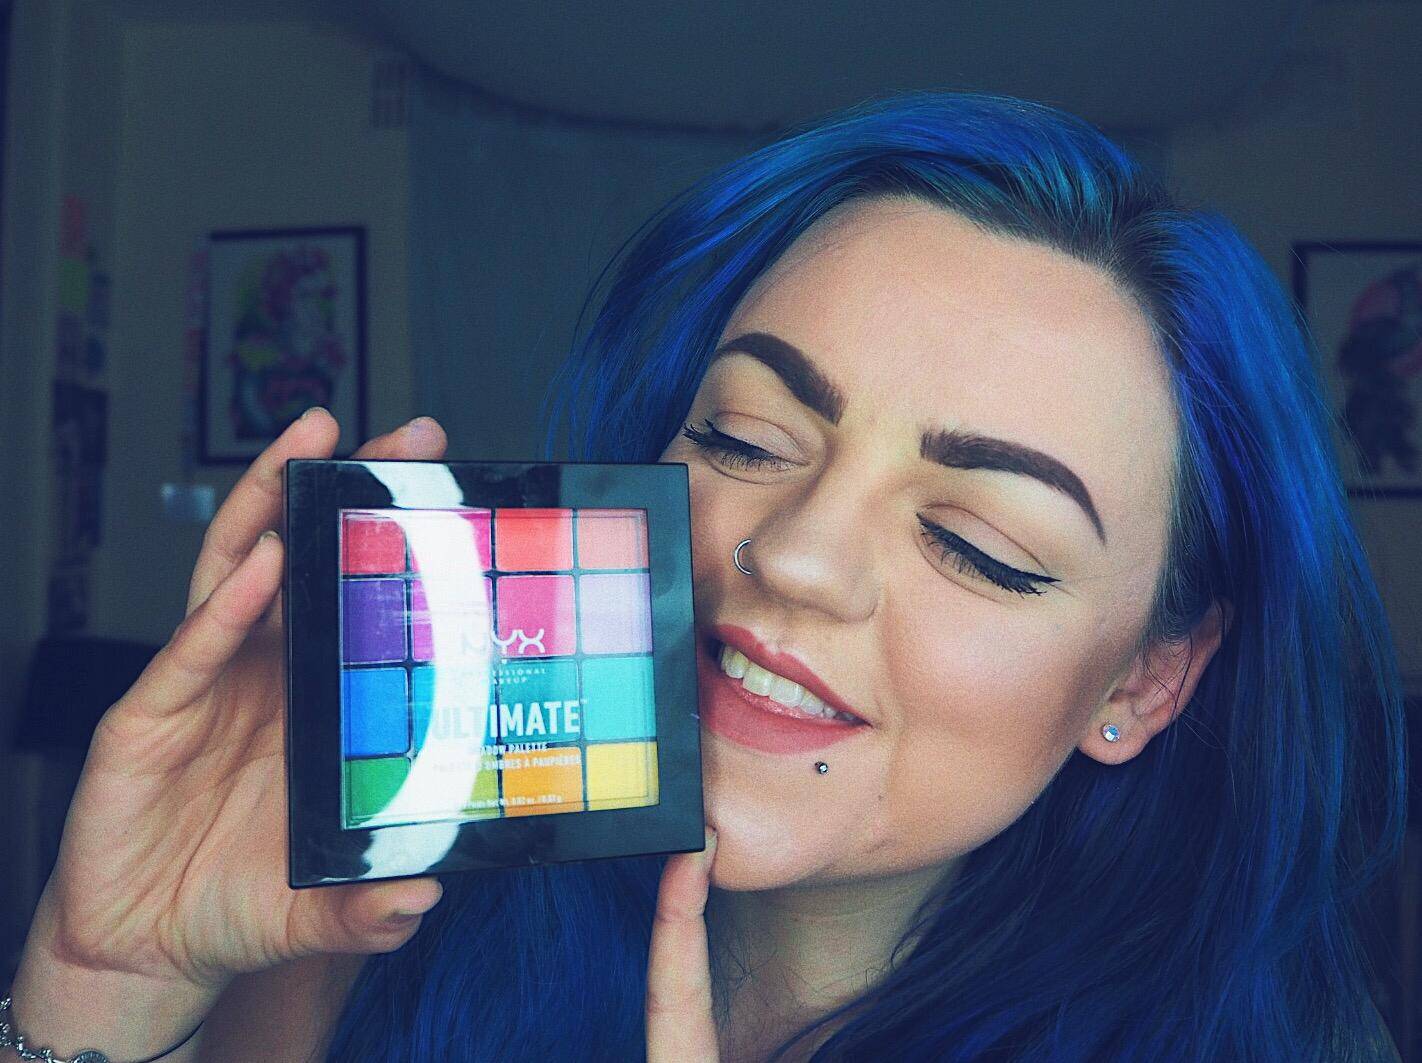
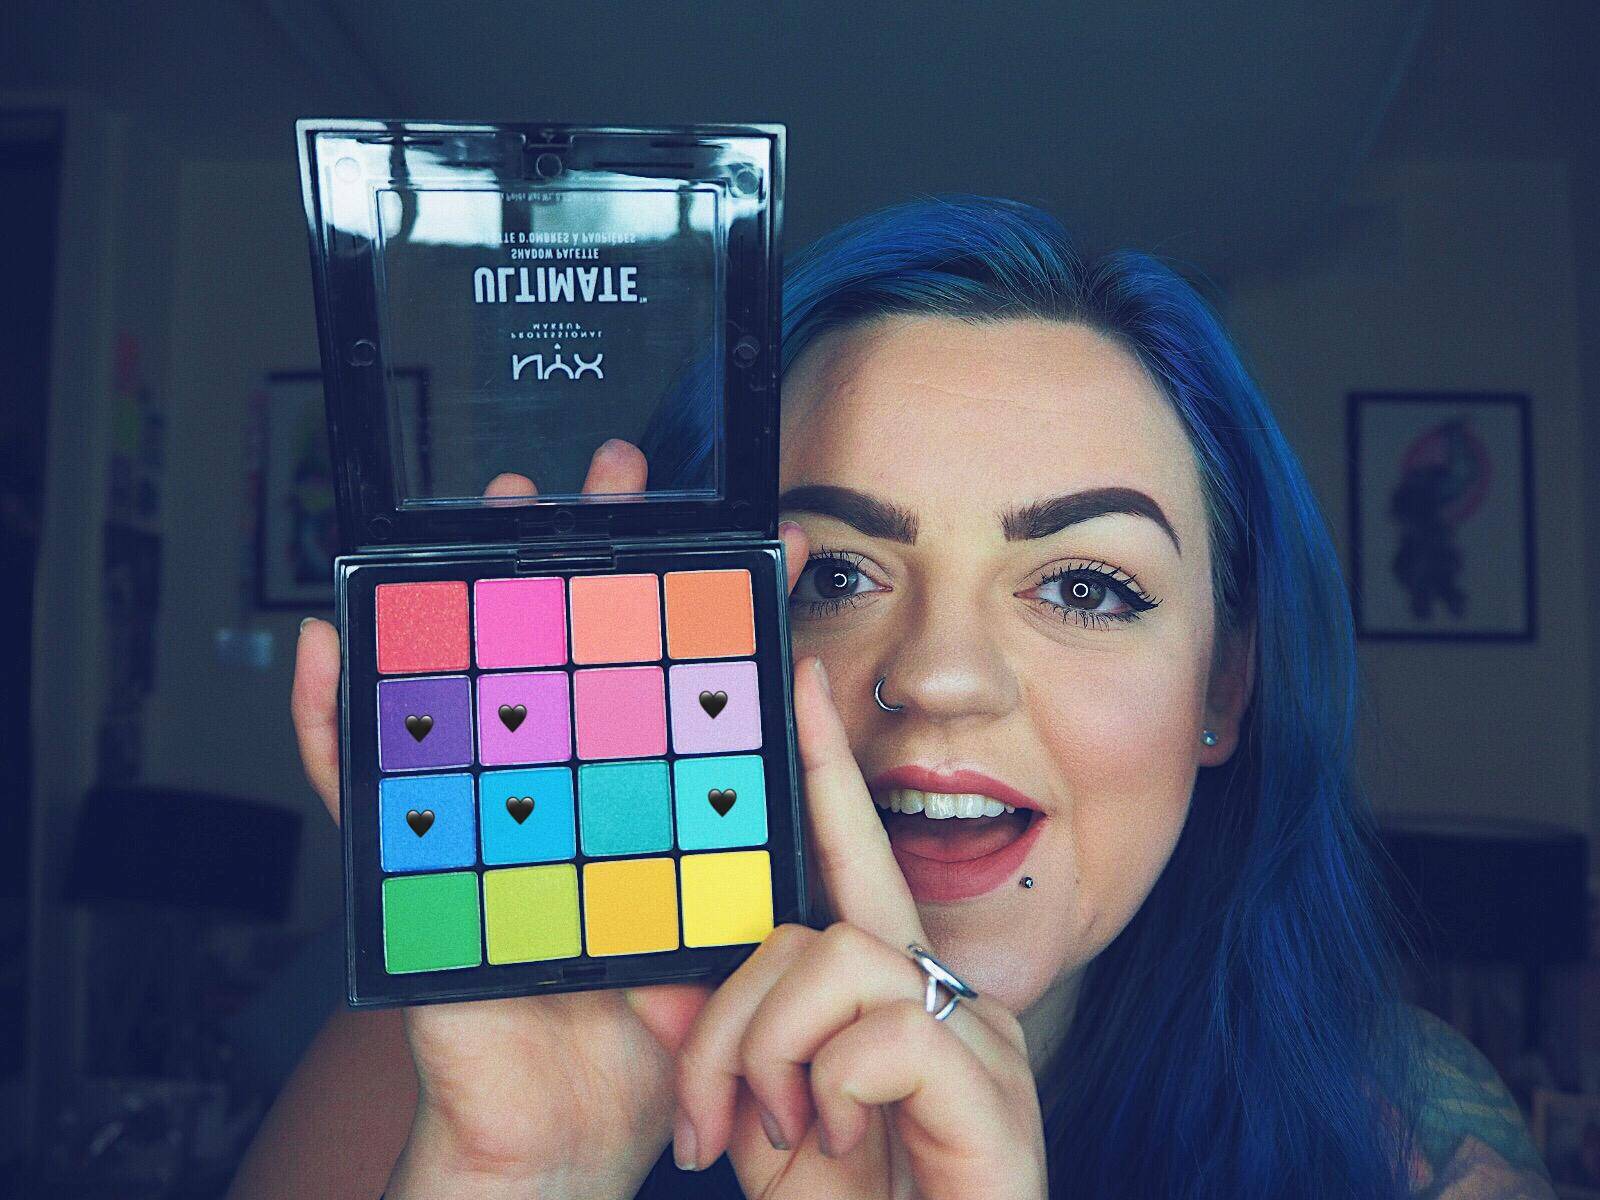
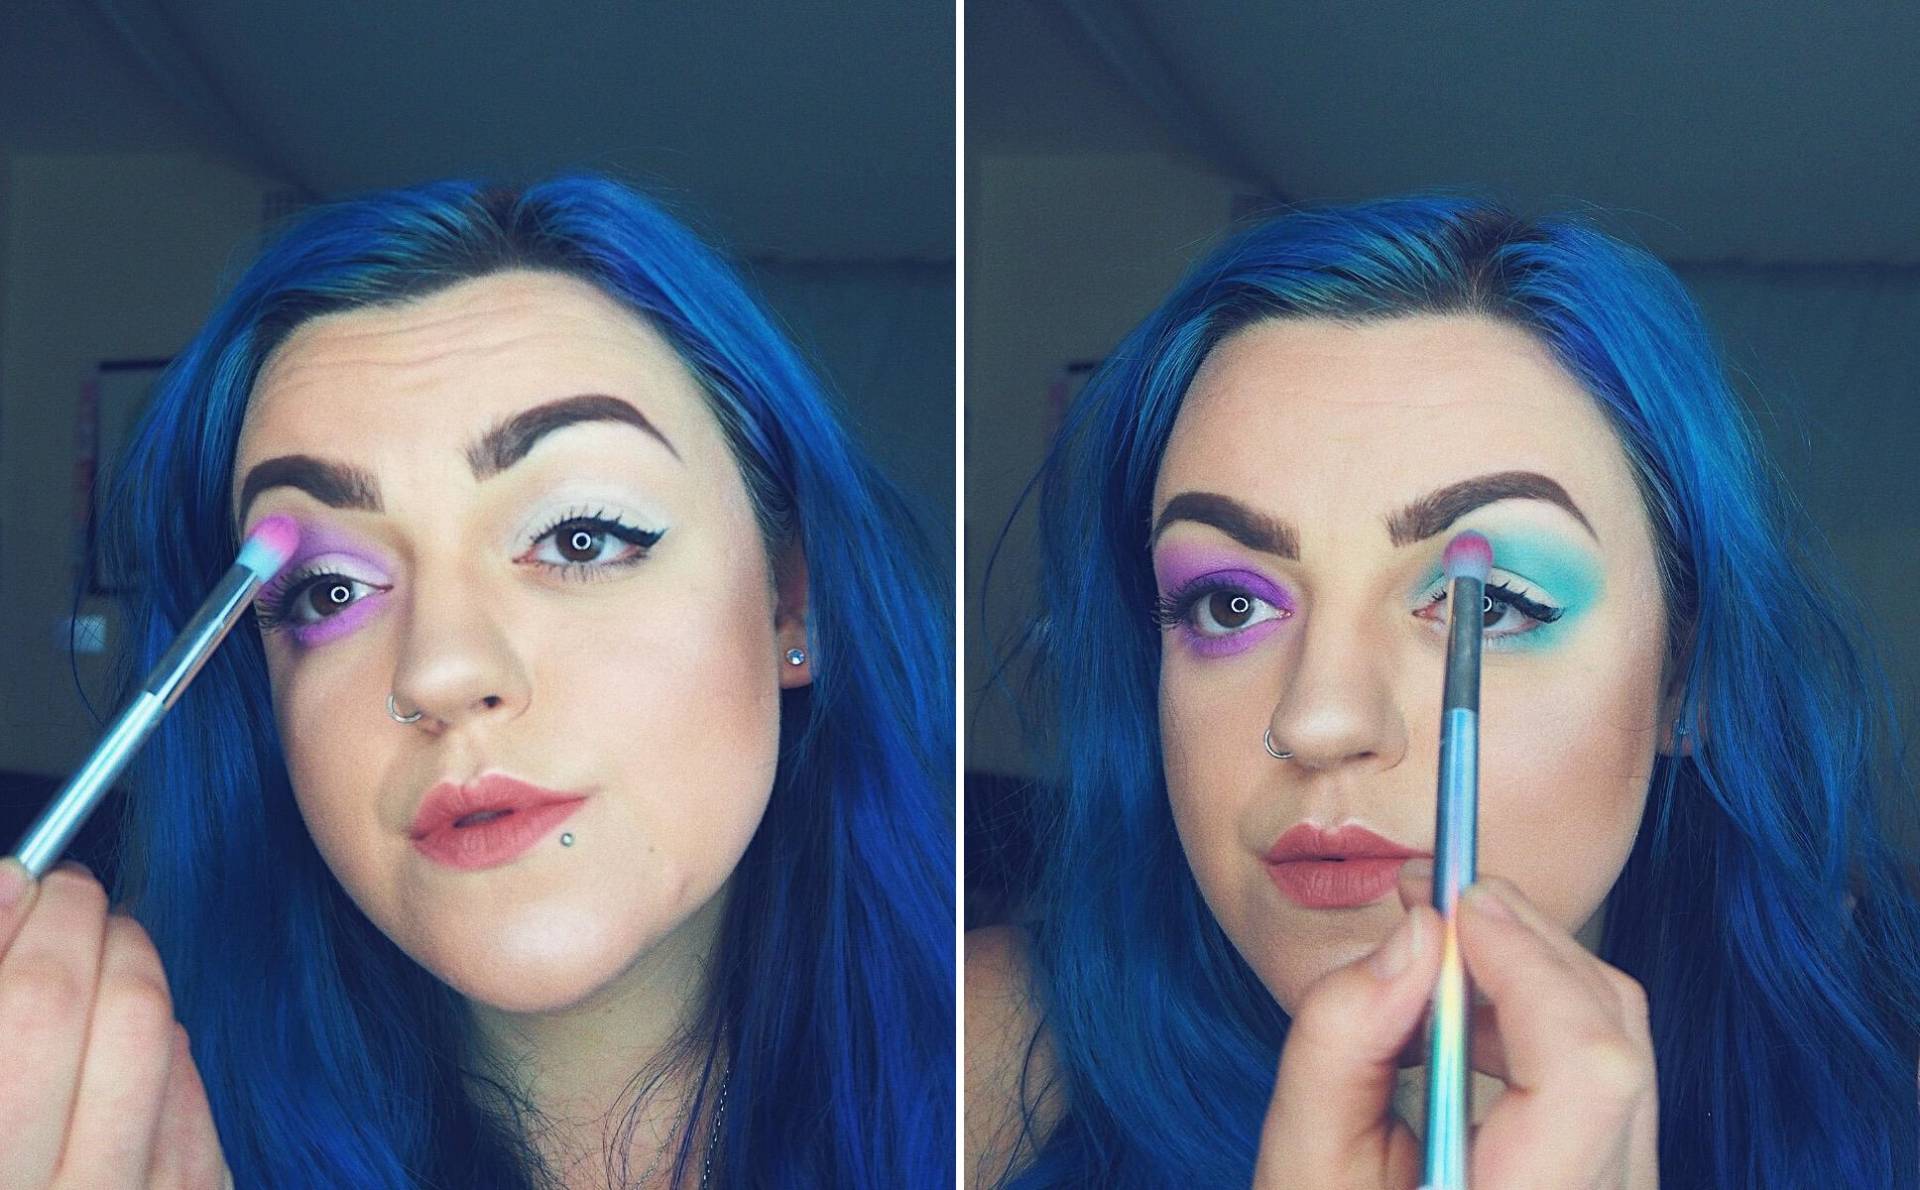
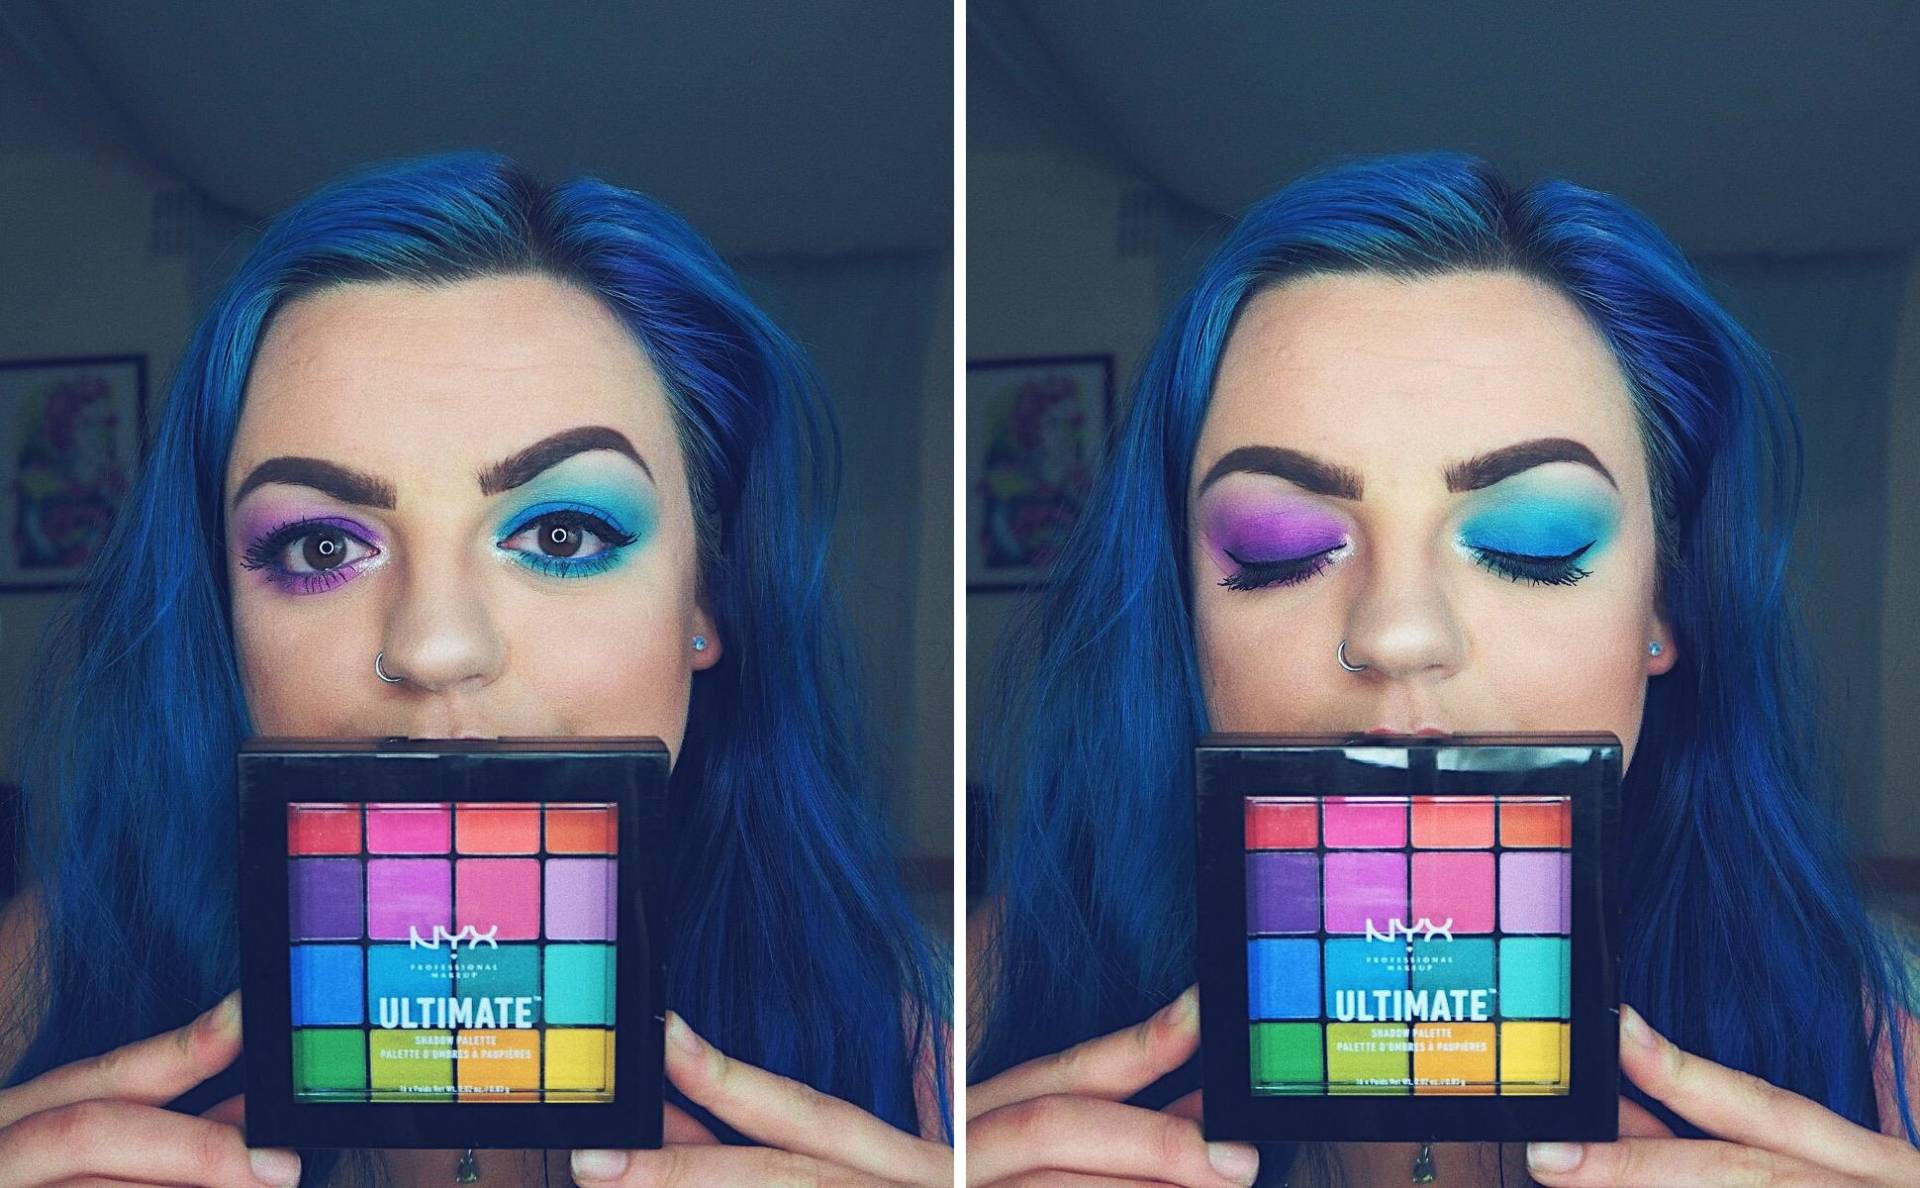
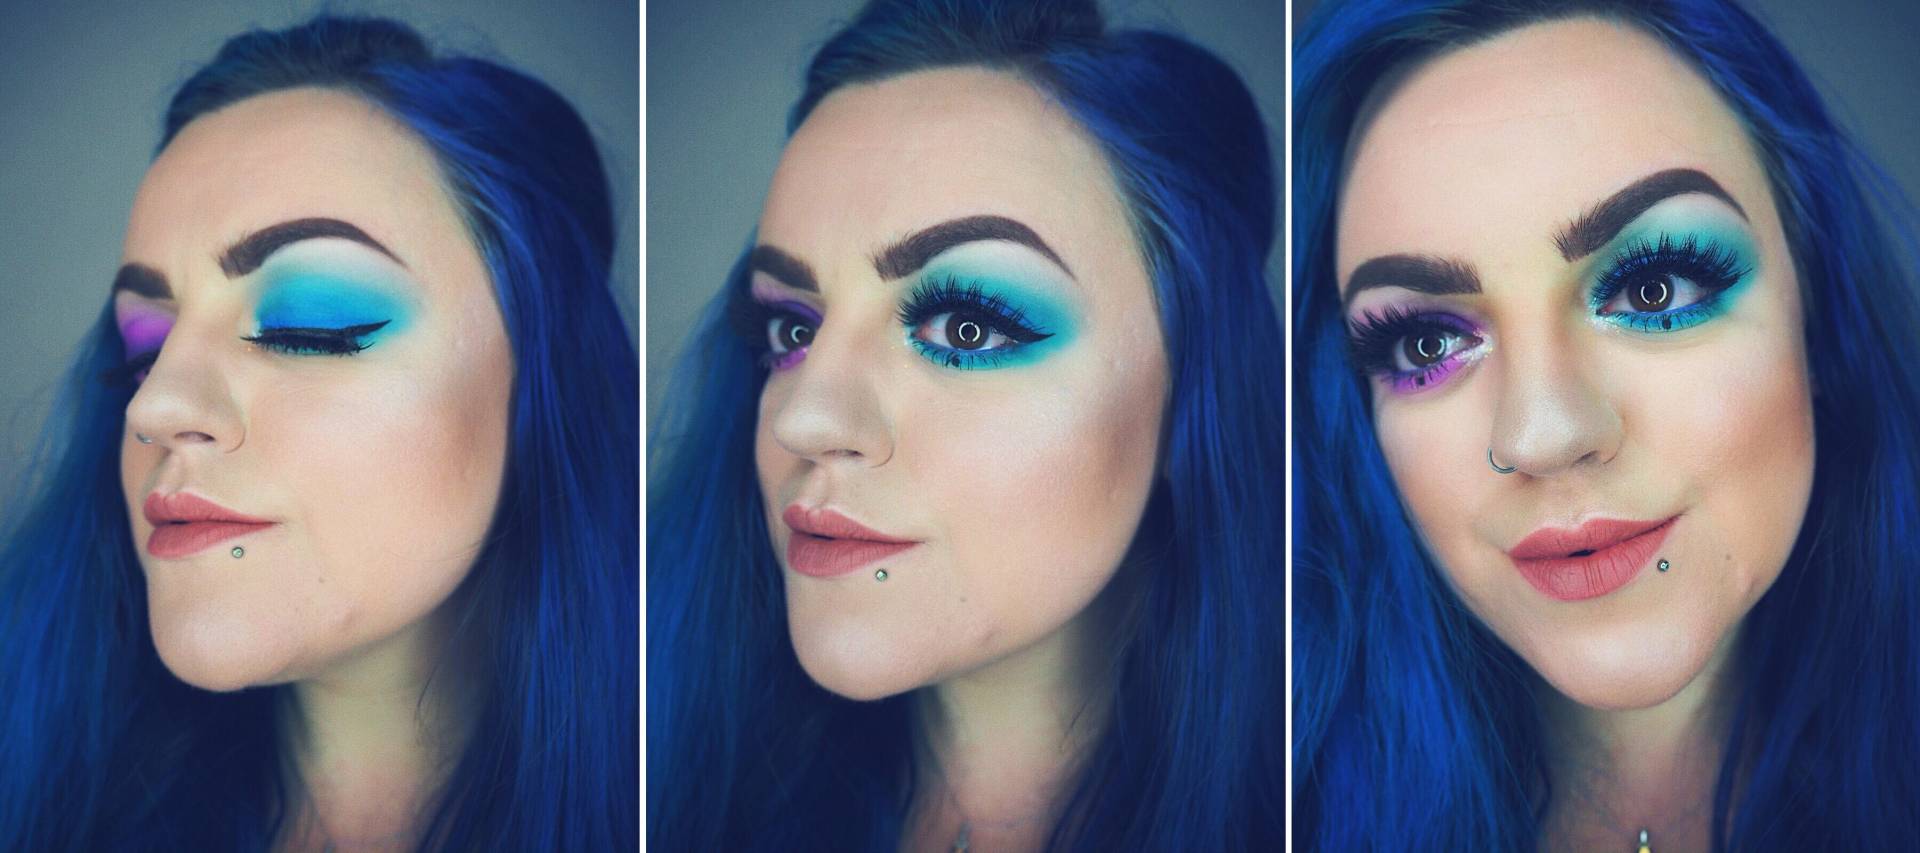
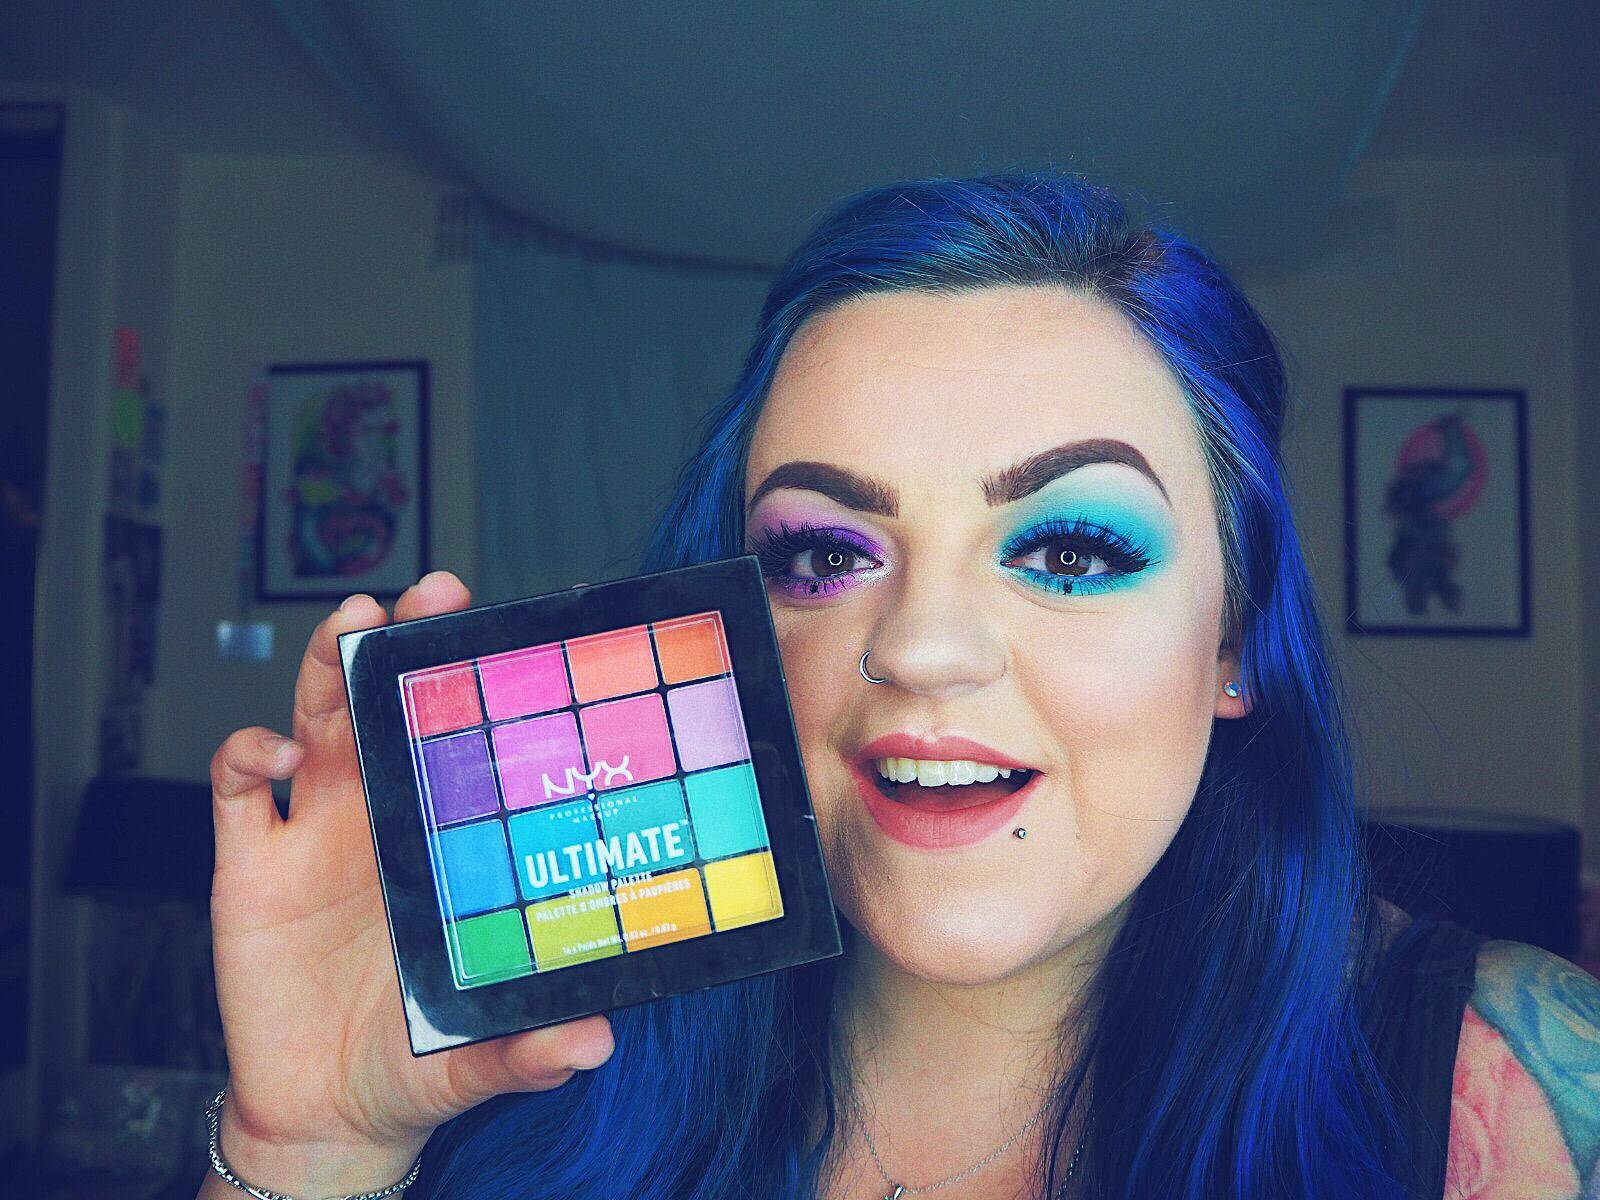
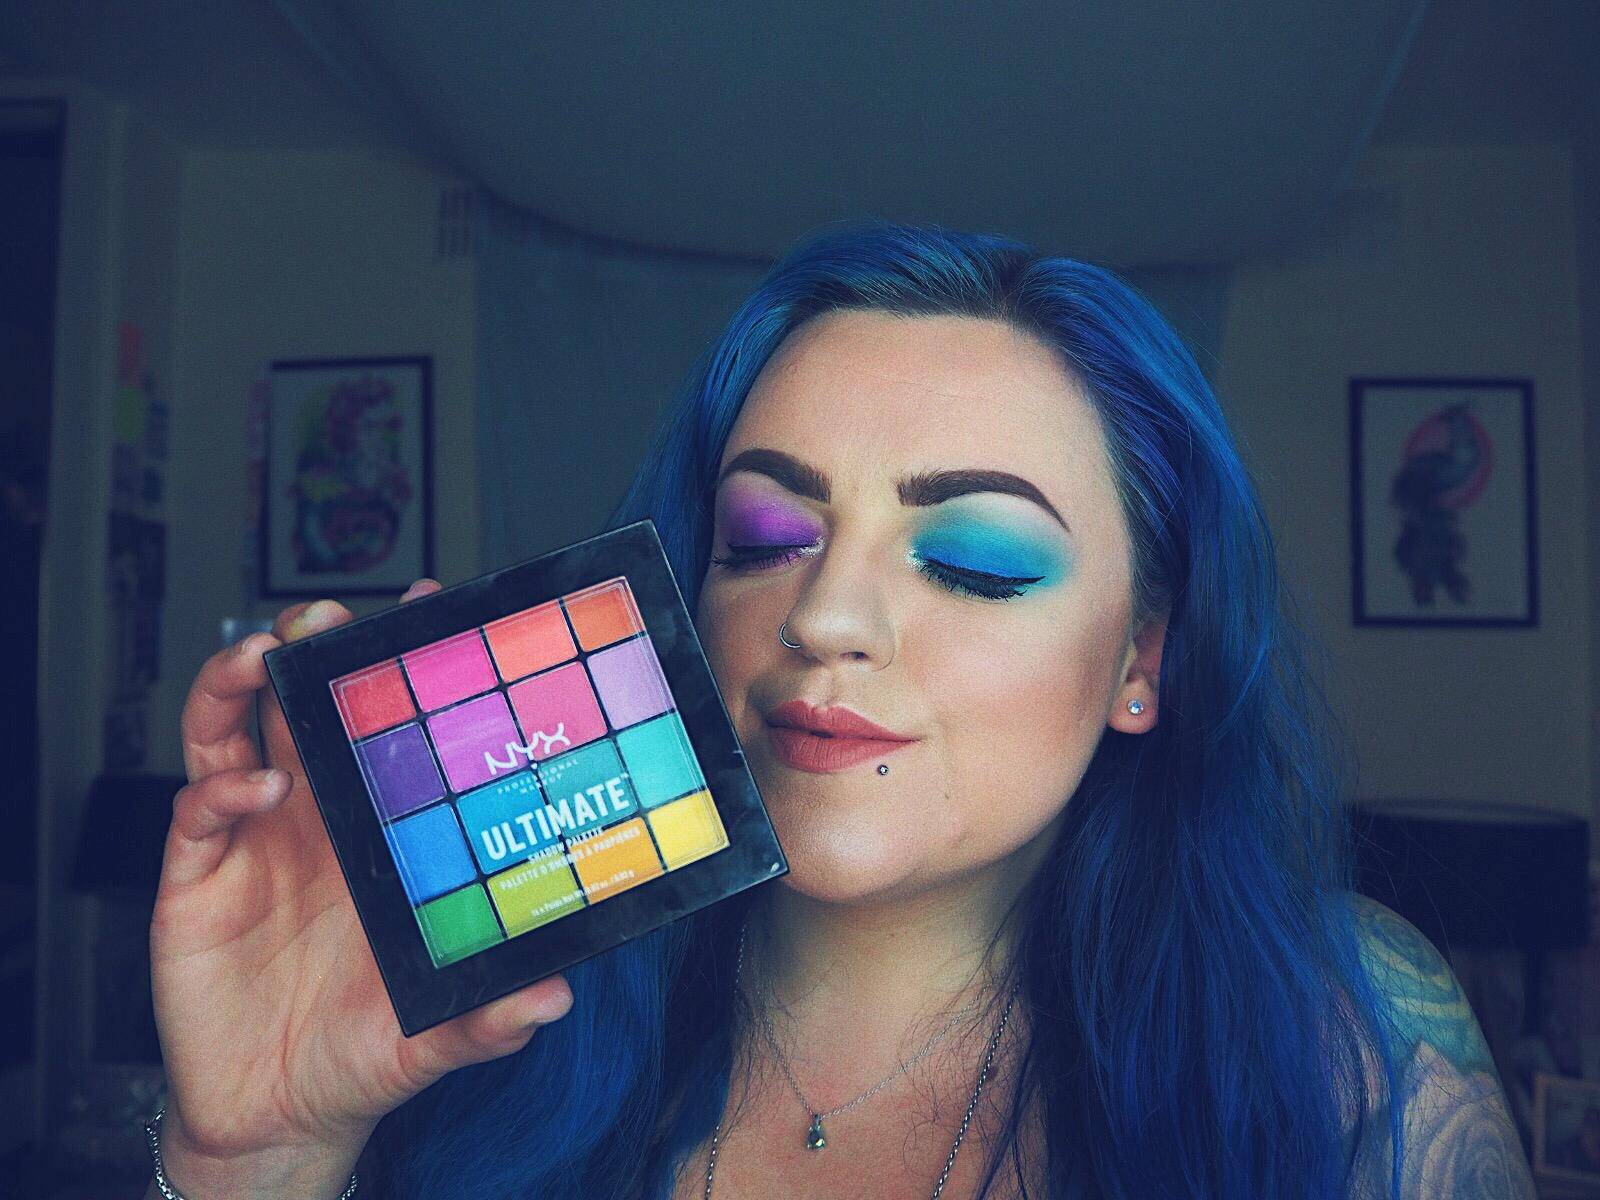
When I go “all out” with my makeup, I either go for dark and grungy, or vivid & colourful. Thanks to a gorgeous Eyeshadow Palette being part of my gifted items for this campaign, I thought I would go for colourful and dramatic. This would also be perfect for a festival or party, it’s interesting and there’s even some glitter…!

Although clothing wise I wear a lot of black, I LOVE statement colours (I guess my blue hair kinda gives that away). So inspired by some makeup I’ve seen on instagram + my current hair (one side is a darker shade of purply blue), I did two tone eyeshadow. Using a combination of 3 shades of both lilac and blues, from my favourite NYX PaletteUltimate Brights’.

NIGHT LOOK: Product List

Products Used (* denotes gifted for this collaboration, all others bought myself):

  • Jumbo Eye Pencil – Milk
  • Ultimate Brights Eyeshadow Palette *
  • Epic Ink Eyeliner
  • Worth The Hype Mascara – Black *
  • That’s The Point Liner
  • Lingerie Eye Tint – White Lace Romance
  • Metallic Glitter – Lumi-Lite
  • Lingerie Lip  – Bedtime Flirt  
  • Matte Finish Setting Spray

NIGHT LOOK: Step-by-step

  1. My base was ready to go, so I went straight in with the dramatic eyes (the colours I used have a little black heart on in the image above)! As a base for the colour to keep it in place + make it show as vivid as possible, I used the ‘Jumbo Eye Pencil’ in Milk. I covered my lid with the pencil and below the lower lash line and rubbed it in with my finger tips.
  2. I started with the lightest eyeshadow colour shade and used a fluffy eyeshadow brush to blend it out into the surrounding eye area. This probably took the longest of all the steps, you gotta bend blend blend in little circular motions. I kept doing this until there is no clear line of where the eyeshadow starts and the surrounding skins begins.
  3. Next the second darkest colour under my lower lash line and all over my lid, blended out into the lightest shade.
  4. And finally, the darkest eyeshadow colour which I gently dabbed close to my upper lash line, blending into the mid colour.
  5. To complete the striking look, I put the Milk ‘Jumbo Eye Pencil’ in my waterline, and used a small brush to apply the darkest eyeshadow colour to my waterline.

  1. On the inner corners of my eye I used the ‘Lingerie Eye Tint’ in ‘White Lace Romance’, dabbed slightly with my finger tip.
  2. I sprayed a little of the ‘Matte Setting Spray’ onto a small brush, dipped into the ‘Metallic Glitter’ in colour ‘Lumi-Lite’. Which I gently pressed into the Lingerie Eye Tint.
  3. An ‘Epic Ink Liner’ top up was needed – gotta make sure those wings can be seen… And I made them bigger and more dramatic!
  4. A mascara top-up was next, especially on the lower lashes (which at this point were covered in eyeshadow drop out).

  1. I added an “eye dot” (as I call it – not sure if that’s the “technical term”) just below my lower lash in the centre of my eyes using the ‘That’s The Point’ liner. I think it adds interest to makeup and also makes eyes look bigger? Although my eyes are already pretty big, it certainly made this entire look more dramatic.
  2. And to complete – lash time! I went for a dramatic pair of eyelashes, to make this look as “extra” as possible! If I was at a festival I would be adding gems + a bunch more glitter.
  3. And finally a repeat of the last step of my day time look. A spritz of the Matte Setting Spray all over my face, to keep the makeup and eyeshadow colours in place.

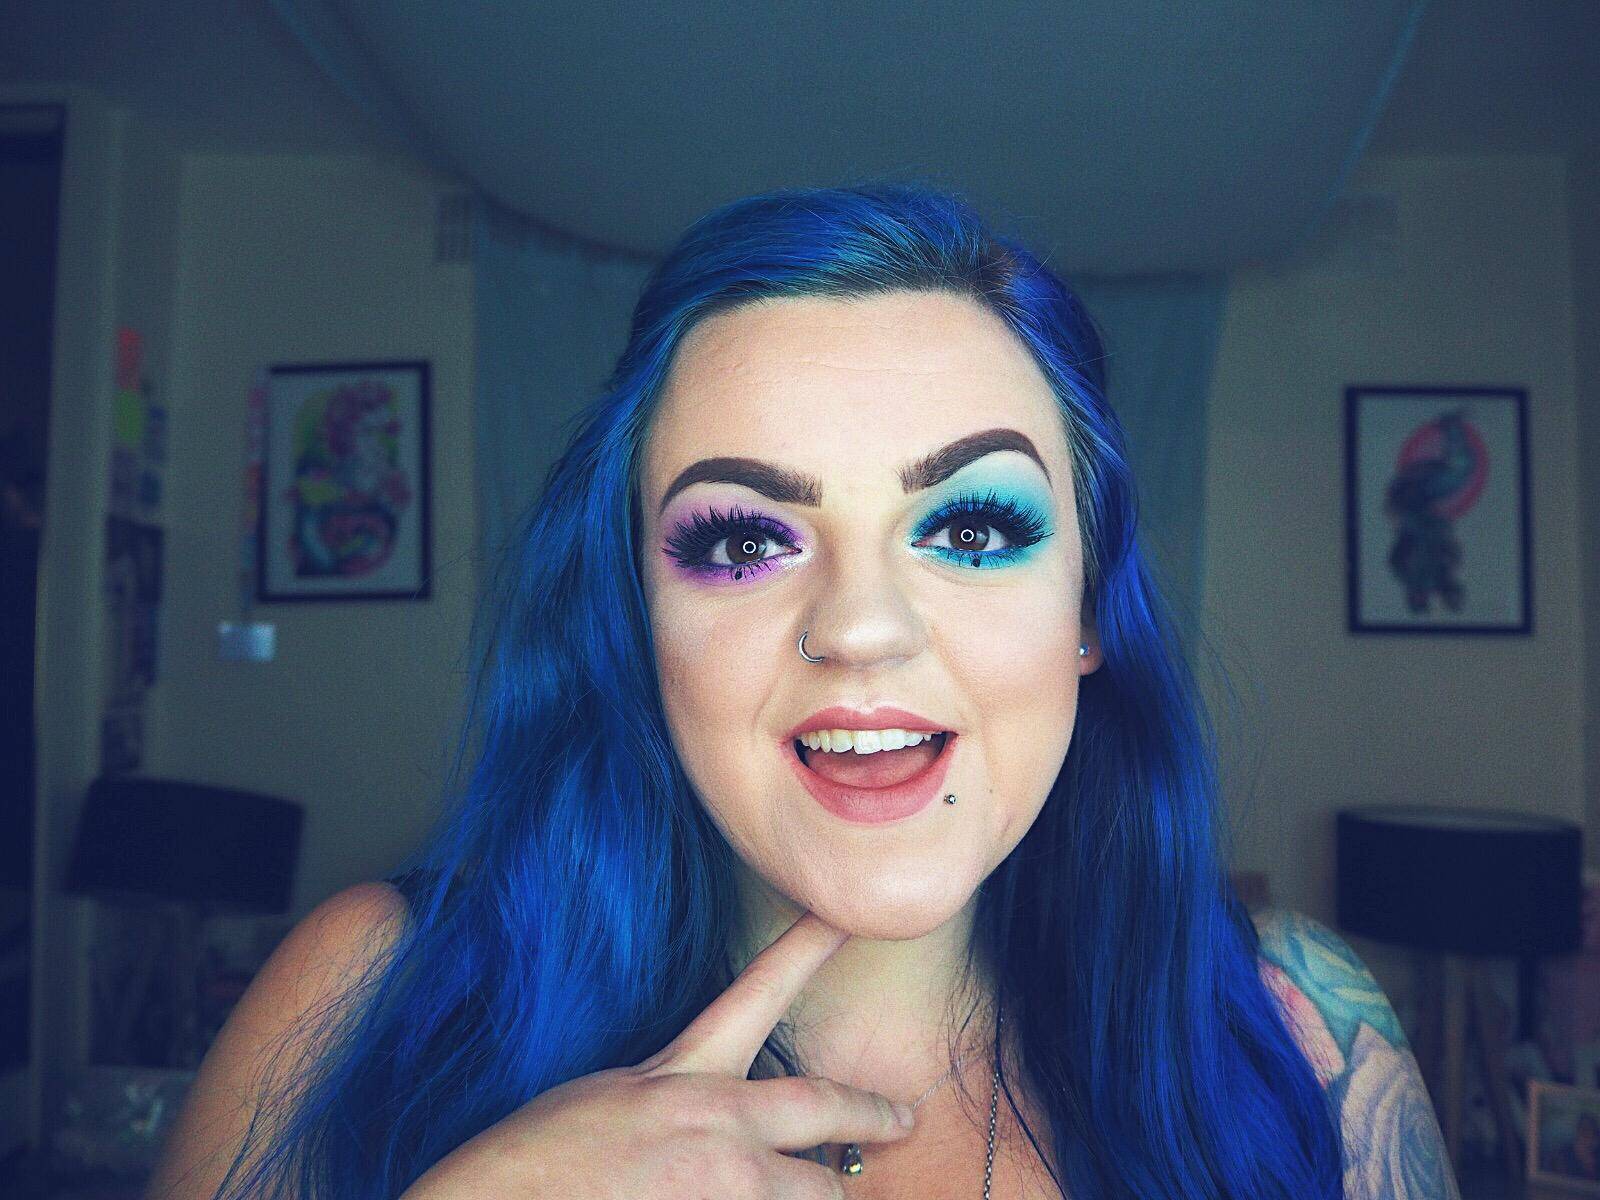
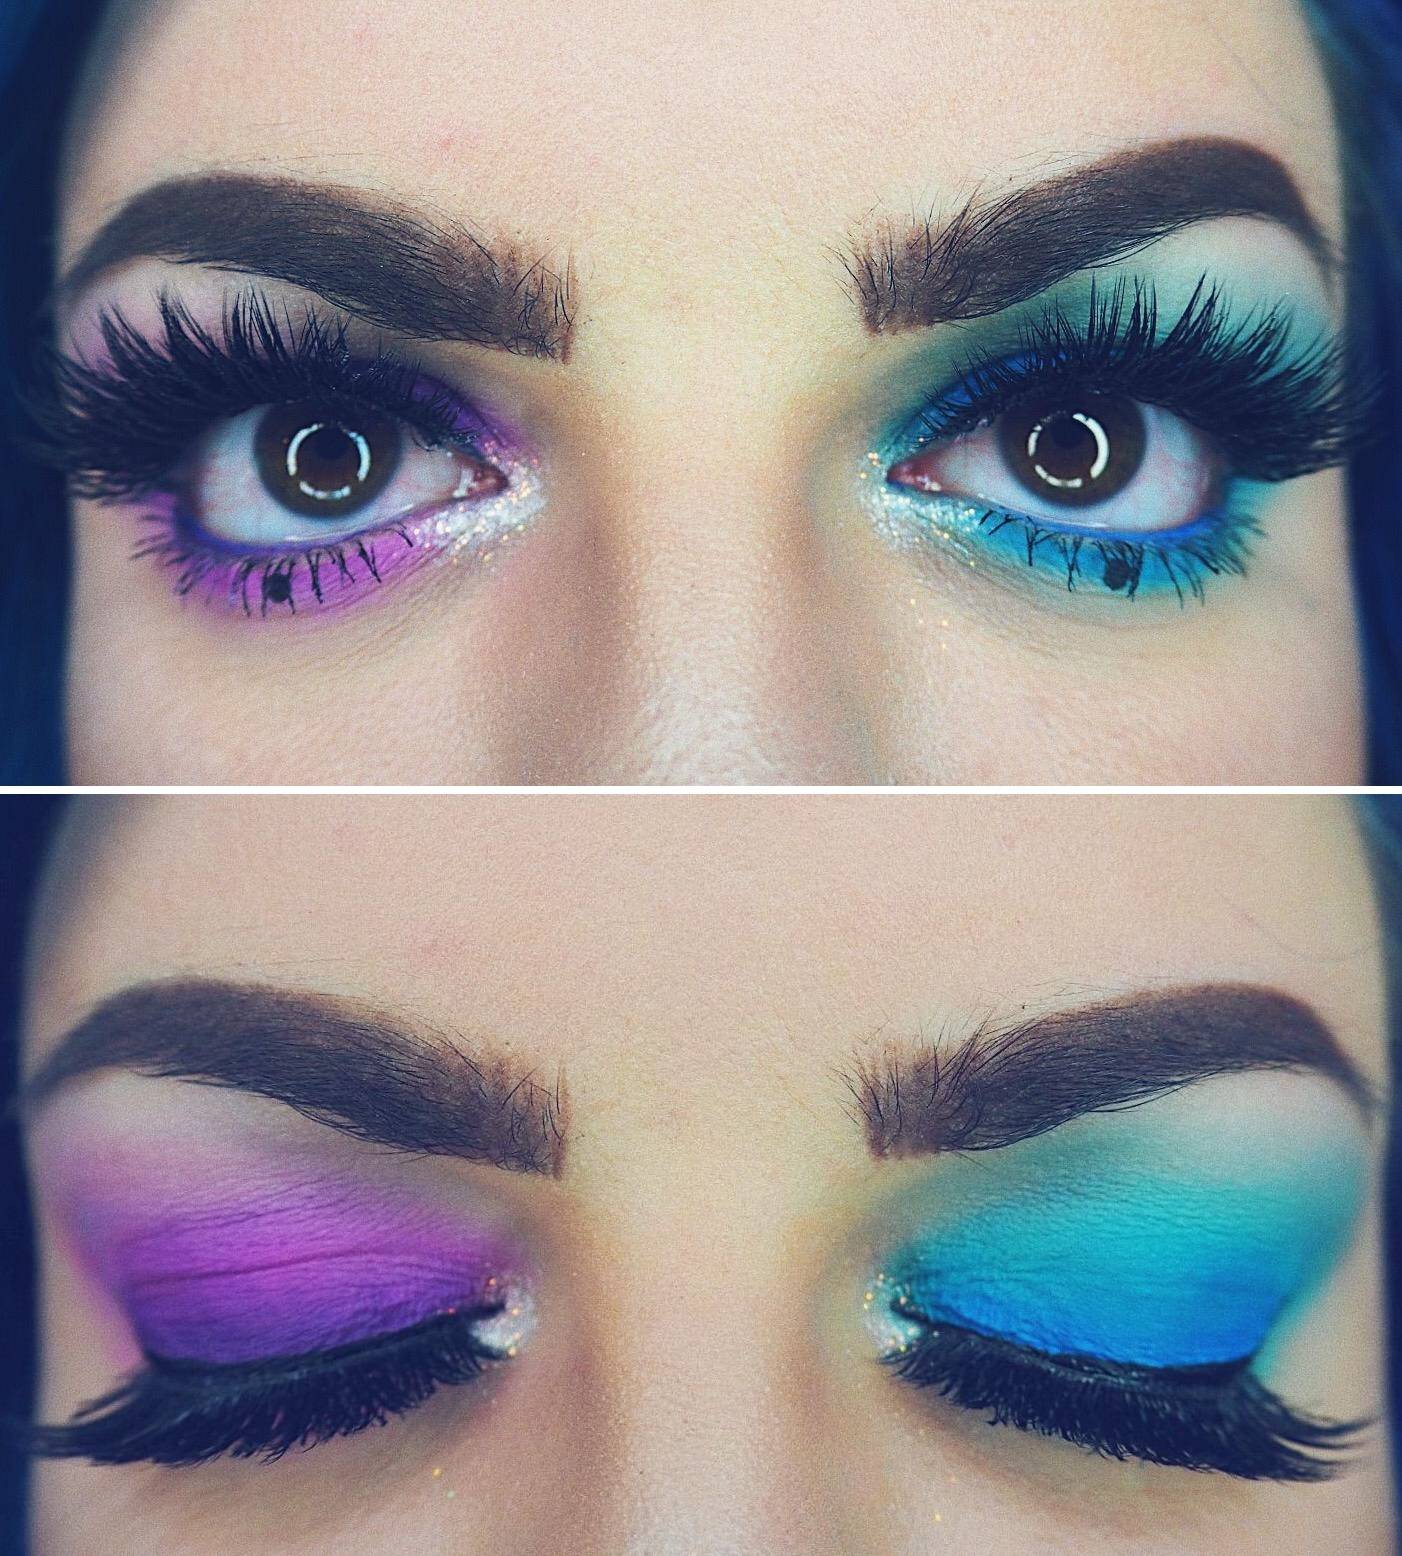
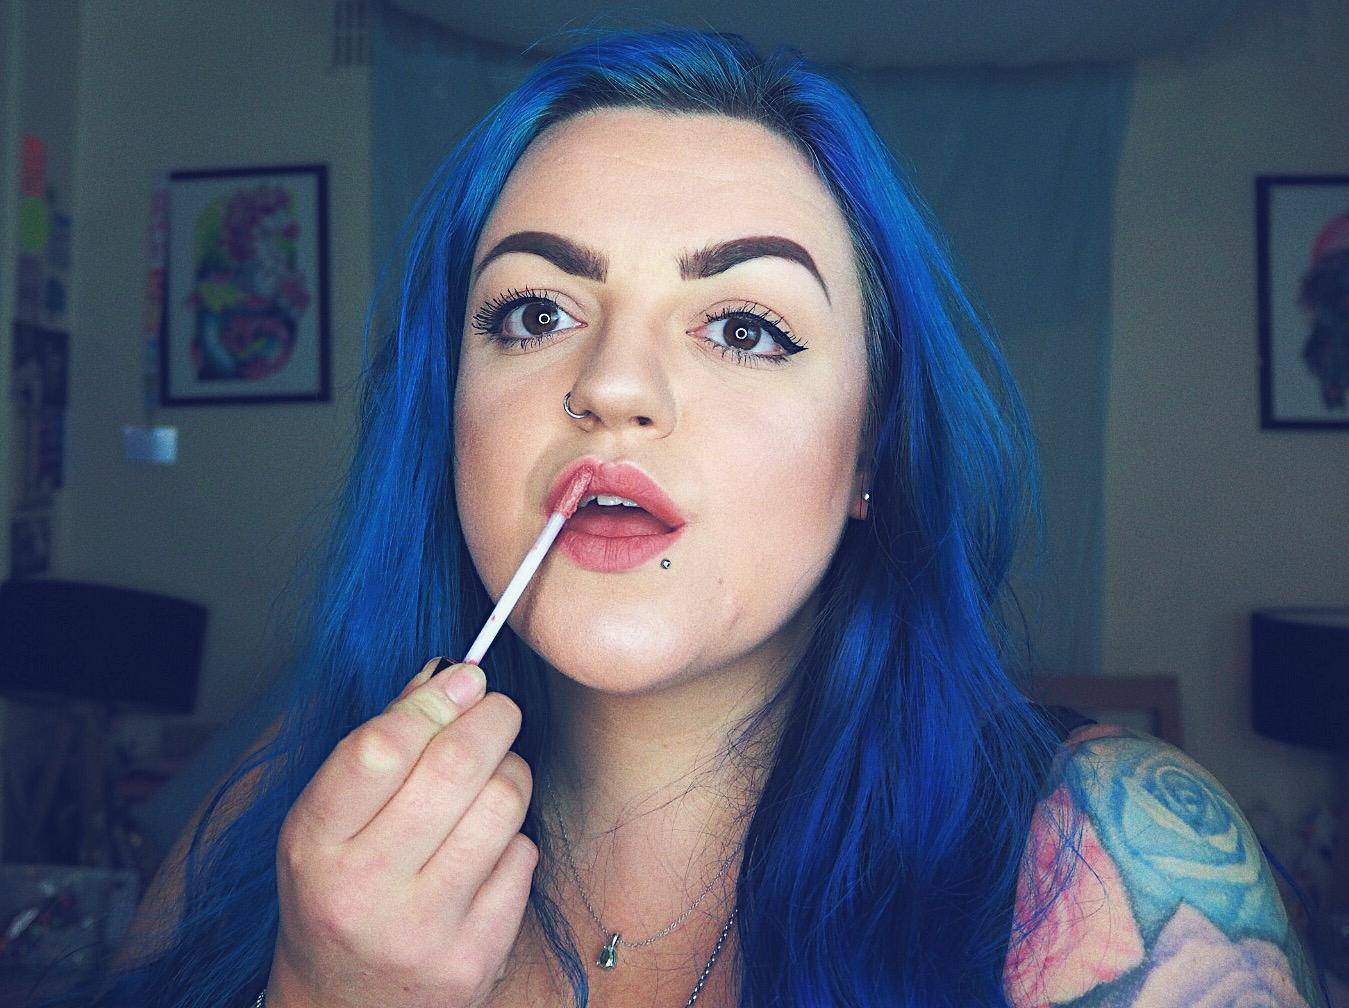
I considered a brighter lip colour, but with the eyes being so bold and dramatic, I kept the same one from the day look (reapplied of course). For a festival or party I might do a brighter colour – a rich dark berry colour could work really well with this.

FINAL THOUGHTS

I am so pleased with my final look, it’s something I’ll definitely be recreating with different colours in the coming months. I am so thankful a brand I love so much wanted to collaborate with me on this using products I love, and I really hope you’ve enjoyed this blog!

Perhaps this might have inspired you to try something new with your makeup? Boots are always my go-to for affordable (cruelty-free) additions to my makeup collection. NYX Cosmetics are available in most stores too and they have such a fab range with plenty of options (including some really cute mini palettes – perfect to keep in your bag for top-ups), so I’m sure something will tickle your fancy.

A full list of the products I used to create this look can be found at the bottom of this post – you can buy most of them directly from the Boots website.

I would love to see what kind of looks you create with NYX Cosmetics products. Please tag me in your posts – I’m @luisachristie on all social media platforms. Share them with the hashtag #BootsNYXRoutines so I can find them. Can’t wait to see what you create!

Lx

This post is in conjunction with Boots but all thoughts are my own.

ALL PRODUCTS (Items with a star were gifted for this collab, all others I bought myself):

2 comments so far.

2 responses to “Day to Night Makeup Using NYX Cosmetics | #BootsNYXRoutines *”

  1. Wow! Stunning look. And it’s defo made me look into getting some of these products.

Leave a Reply

Your email address will not be published. Required fields are marked *

This site uses Akismet to reduce spam. Learn how your comment data is processed.

Welcome to luisachristie.co.uk

Welcome to luisachristie.co.uk

your queer, plus size, vegan pal 💜

a lifestyle blog, with a colourful & alternative edge... Covering: vegan & cruelty-free food / drinks / products, live music / festivals / travel (inc. adventures with mum), and self love & body confidence... to name a few.

Usually found befriending animals (especially cats)

Bloglovin’

Follow

Subscribe to luisachristie.co.uk

Enter your email address & you\'ll receive notifications of my new posts straight to your inbox!

Blog Post Archive